Page objects are no longer necessary. We can emulate them with page scopes instead.
Page objects are a commonly used design pattern for developing web tests with Selenium web driver. But coding page objects and tests to an API is a very developer centric activity. The role of a tester is to write and execute tests and not to develop and compile code. The same can be said for developers when they put their test hats on.
Furthermore, Gherkin features that describe the expected behavior of a system are good enough to drive tests. There is no need for sophisticated code or a graphical UI that requires up front modelling and compilation to generate tests. It is much simpler to just specify the expected behavior in plain text and have an interpreter execute it.
Introducing gwen-web
gwen-web is a tool that aims to give testers this dynamic capability and do away with page objects and compilation altogether. It is powered by gwen; an interpreter that maps gherkin features to executable code. In the case of gwen-web, it maps Gherkin features to precompiled Selenium code to drive a web browser. As a user of this tool, you never have to write any Selenium code or develop any page objects at all.
Page Scopes
Gwen-web introduces the concept of page scopes. Page scopes are stacks of name-value pairs bound to namespaces in memory. Gwen uses them internally to manage all pages and web element bindings for you. You simply specify what pages and web elements you require using a prescribed DSL.
It is best to demonstrate with an example. The floodio challenge walks you through a series of web pages that prompt you to perform some tasks. In the remainder of this post, we will use the Gwen REPL (Read-Eval-Print Loop) console to perform these tasks and complete the challenge.
Install gwen-web by following the install instructions here.
After completing the installation, open a command prompt to your installed gwen-workspace directory and enter the following command:
Windows:
gwen
or Mac:
./gwen
REPL Console
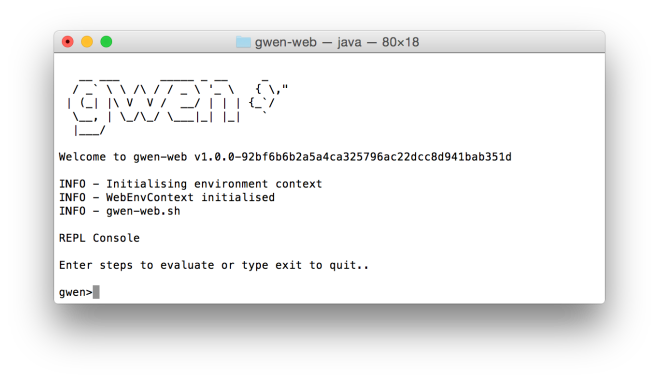
The gwen REPL will start and you will see the following console displayed:
The REPL is case sensitive and does not accept fuzzy input. So be sure to enter all steps and commands exactly as shown in this post.
When Gwen starts up, it always implicitly creates and activates a default feature scope with no bindings in it. This is a global scope that can be used to set bindings for elements that are common and accessible across multiple pages (the entire feature).
The first thing we will do is create and activate a new page scope for the floodio start page. No need to write a page object, just type the following into the Gwen prompt and hit enter:
When I am on the start page
Gwen will create a new scope called “start page” and activate it in memory before informing you that it has successfully completed the step. If you enter env at the Gwen prompt, you will see the output of the environment context in memory and our newly created scope called “start page”.
{
"scopes" : [ {
"scope" : "start page",
"atts" : [ ]
} ]
}
All we have done here is defined a new page scope called “start page” and made it the currently active scope. Now we will store the url of the floodio start page into this scope so that Gwen can know where to navigate to. Enter the following to bind the floodio start page URL to the currently active “start page” scope:
Then the url will be "https://challengers.flood.io/start"
When it successfully completes, enter env at the prompt again to see our bound URL:
{
"scopes" : [ {
"scope" : "start page",
"atts" : [ {
"url" : "https://challengers.flood.io/start"
} ]
} ]
}
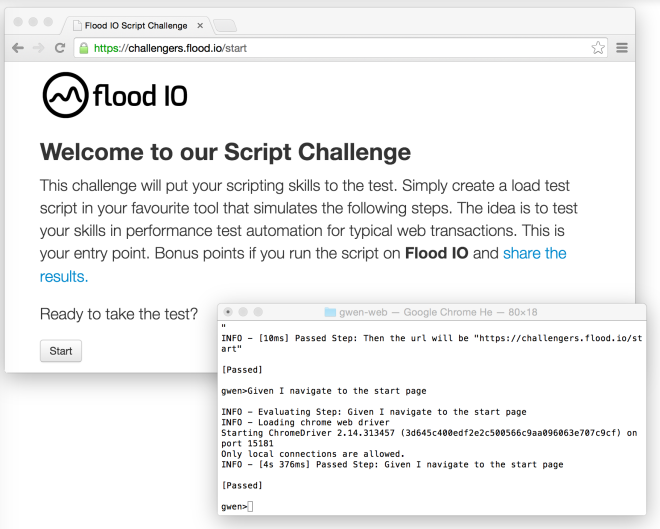
We have now informed Gwen what the url of the floodio start page is. We will now instruct Gwen to open a browser to that page. Enter the following, and observe!
Given I navigate to the start page
This step will start a new browser window, locate the URL for the start page, and point the browser to that location.
Gwen-web supports the Firefox, Chrome, Safari, and IE browsers. It uses Firefox as the default browser. To use a different browser, follow the instructions in this user guide.
Now we will tell Gwen how to locate the Start button that appears on the start page. To do that, we need to know how the button has been defined on the page. If you right click the Start button in the browser page and click “inspect element”, you will see that it is defined as an input element with a name attribute set to “commit”.
<input class="btn blue" name="commit" type="submit" value="Start">
Now enter the following at the Gwen prompt to bind this information to the “start page” scope that is currently active:
And the Start button can be located by name "commit"
Type env at the Gwen prompt again if you would like to see how this locator information is bound to memory.
Before continuing, be sure to close the “inspect element” pane if you still have it open in your browser. Leaving it open may interfere with Gwen and could result in errors.
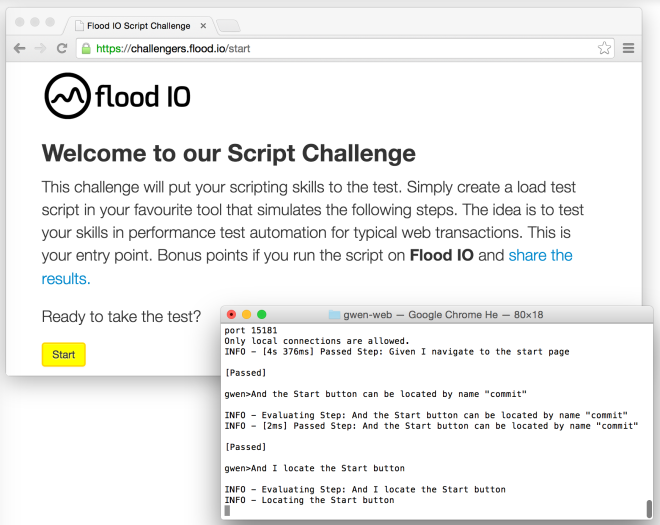
Now enter the following to verify that Gwen can locate the Start button:
And I locate the Start button
This step locates the Start button and highlights it for a short time. You should see the Start button being highlighted and then unhighlighted.
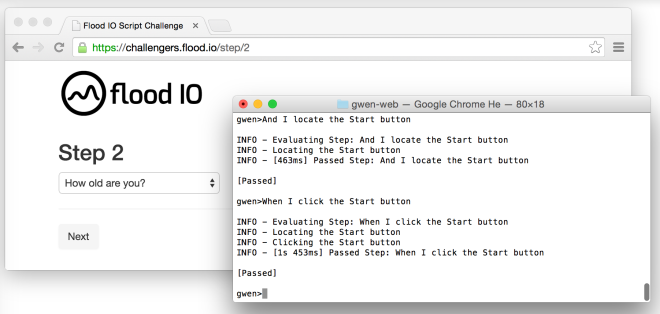
This confirms that Gwen can locate the button and that we have bound the locator correctly. Now enter the following to have Gwen click the Start button:
When I click the Start button
Gwen will now click the Start button and the browser will navigate to the next page.
To proceed from here, we again first need to create a new page scope for this page, and then tell Gwen how to locate the elements we wish to interact with. Enter the following to create a new page scope for this page:
Then I am on the step 2 page
This will create a new empty scope in memory called “step 2 page” and make it the currently active scope. If you type env at the command prompt, you will see it printed at the bottom.
{
"scopes" : [ {
"scope" : "step 2 page",
"atts" : [ ]
} ]
}
By default, the
envcommand displays only the currently visible scopes (in this case, the step 2 scope). To display all scopes (including our previously created start page scope), you need to specify the-aswitch.
To see all scopes, type env -a:
{
"scopes" : [ {
"scope" : "start page",
"atts" : [ {
"url" : "https://challengers.flood.io/start"
}, {
"the Start button/locator" : "name"
}, {
"the Start button/locator/name" : "commit"
}, {
"the Start button/click" : "true"
} ]
}, {
"scope" : "step 2 page",
"atts" : [ ]
} ]
}
All page scopes are managed in memory as JSON objects on a stack with the most recently active scope appearing at the bottom. For more details about how this stack works, you can study the documented source on the Gwen project site here.
Moving on, we can now proceed to bind the locator information for the ‘how old are you’ dropdown and the ‘Next’ button elements that appear on the step 2 page. If you inspect these elements in the page source, you will find that they are defined as follows:
<select class="select optional" id="challenger_age" name="challenger[age]">
<option value="">How old are you?</option>
<option value="18">18</option>
<option value="19">19</option>
...
</select>
<input class="btn" name="commit" type="submit" value="Next">
Again, be sure to close the “inspect element” pane (if you opened it) in the browser before continuing.
Enter the following into the gwen prompt to let Gwen know how to locate the ‘how old are you’ dropdown element (in this instance we locate it by Id).
Given the how old are you dropdown can be located by id "challenger_age"
Now for the next button. We could locate it by name in the same way we did for the Start button on the start page, but to mix things up a bit (and because we can), we will locate it by class instead. Enter the following to let Gwen know how to locate the next button:
And the next button can be located by class name "btn"
You can confirm that both of these locators work by entering the following steps in the console (one after the other) to highlight them:
And I locate the how old are you dropdown
And I locate the next button
After confirming the above, we can proceed to select an age and click the next button before creating a scope for the next page:
 And I select "21" in the how old are you dropdown
 And I click the next button
Then I am on the step 3 page
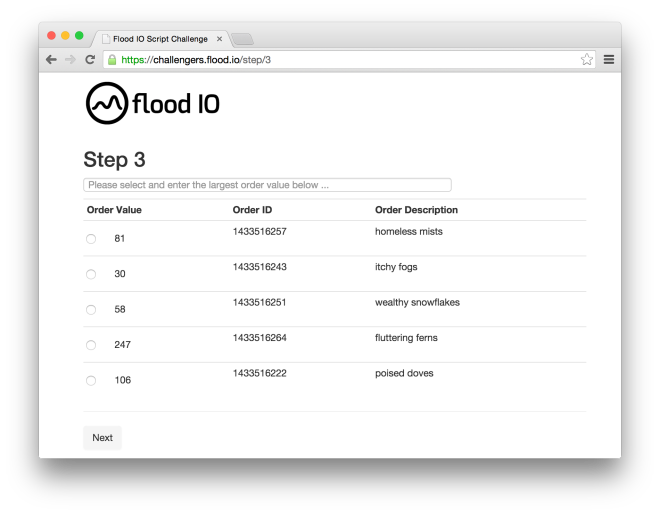
We are now on the step 3 page. Here we need to select and enter the largest order value from the list of radio buttons displayed on the page.
How do we instruct Gwen to find the largest order value? Lets see if we can find it with some JQuery scripting. Open the browser console view and enter the following lines of script to locate the largest order value:
var values = $.map($('.radio'), function(x) { return parseInt($(x).text()); });
var maxValue = Math.max.apply(Math, values);
Now that we have the largest order value, we can locate the associated radio button as follows:
var maxRadio = $('.radio:contains("' + maxValue + '") input[type="radio"]');
We have shown above that we can locate the largest order value using JQuery. Luckily for us, gwen-web allows us to locate elements by JavaScript (but only through one liner expressions). Furthermore, if the page in the browser has loaded the JQuery library then we can use it too. Now enter the following steps into the console REPL so that Gwen can find the largest order value and locate its associated radio button:
Given the largest order value is defined by javascript "Math.max.apply(Math, $.map($('.radio'), function(x) { return parseInt($(x).text()); }))"
And the largest order radio button can be located by javascript "$('.radio:contains(${the largest order value}) input[type="radio"]').get(0);"
String Interpolation:
Notice how we referenced
${the largest order value}defined by the first step inside the JavaScript locator expression of the second step. This saves us from repeating the expression used to find the largest order value across two steps.
Now enter the following to locate the radio button having the largest order value to confirm that it works:
And I locate the largest order radio button
We had to use some JQuery scripting here to locate the largest order value. Scripting is necessary in this case because we need to enter values and select buttons based on the results of a function applied to the elements and values on this page. This is a good example of an interaction that cannot be readily automated without some scripting.
The other things we need to locate on this page are the input field into which we will need to enter the largest value into, and the next button. We define the locators for these by entering the following:
And the largest order input field can be located by id "challenger_largest_order"
And the next button can be located by class name "btn"
We are now ready to let Gwen find the largest order value, type it into the input field, click the radio button for that value, and then click next. We do that by entering the following steps:
Given I type the largest order value in the largest order input field
 When I click the largest order radio button
  And I click the next button
 Then I am on the step 4 page
The step 4 page merely asks us to click the next button when we are ready. We do this straight away by entering the following:
Given the next button can be located by class name "btn"
 When I click the next button
 Then I am on the step 5 page
This will bring us to the step 5 page (the last page in the floodio challenge).
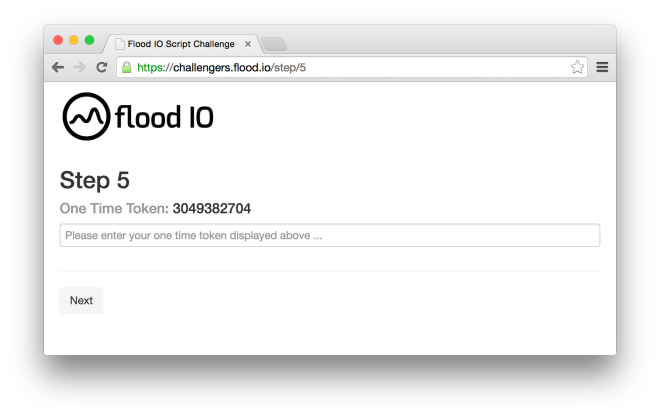
This page requires that we copy a provided token value into a field and then click next. Inspecting the page source reveals that the token is displayed in a span element defined with a class="token" attribute. The input field has an id of “challenger_one_time_token”, and the next button is defined in the same way it was in the previous pages. We now define locators for these by entering:
Given the one time token can be located by css selector ".token"
  And the one time token field can be located by id "challenger_one_time_token"
  And the next button can be located by class name "btn"
If you take a closer look at the source you will see that the token value is actually loaded by an ajax request when the page is loaded. Waiting for this value to load is not a problem when running Gwen in REPL mode as the ajax request will have most likely completed in the time that the REPL is idly waiting for us to enter the next step at the prompt. But if we were running all the steps we’ve entered so far very quickly (as in automated batch mode), then we would need to wait for the ajax request to complete and the token value to be populated first before attempting to access the value. Enter the following to have Gwen wait for the token value to be populated (note: if the token is already populated, then Gwen will immediately return without waiting).
And I wait for the one time token text
Now that we know the token is loaded, we can proceed to copy it into the input field and click the next button to complete the challenge. Enter the following steps to do that:
Given I type the one time token in the one time token field
 When I click the next button
 Then I am on the done page
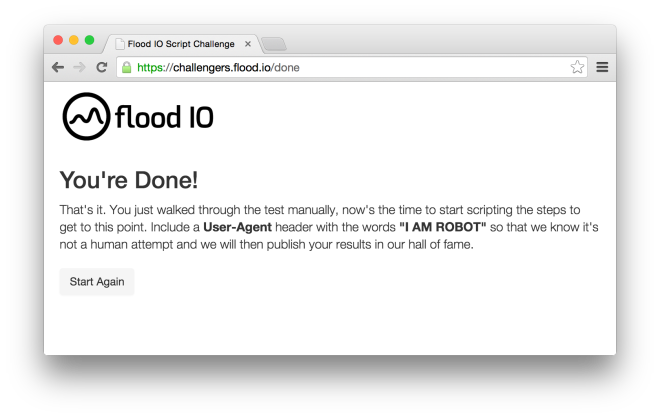
This will take us to the done page, telling us that we’re done.
To finish, type exit at the Gwen prompt. The browser and the REPL will shut down.
Separation of Concerns
Two major benefits that page objects provide include the separation of test logic from configuration and the elimination of unwanted redundancies. Gwen can provide these same benefits through meta features.
Configuration by Meta
A meta feature is simply a configuration specification expressed as a gherkin feature (a feature describing a feature if you like). Recall that some of the steps we typed into the REPL above just configure (or tell Gwen) what the url to a page is or how an element on a page can be located. This configuration information can all be captured in a meta feature file and loaded into Gwen on startup. We can also eliminate duplicated steps and other redundancies too. For example, you will have noticed that the step that configures the next button locator was repeated above for every page that contains a next button. Since this button is common across multiple pages, it makes sense to define it once and reuse it. This can be done by binding it to the global feature scope that is implicitly created and activated by Gwen when it starts up.
So we can now capture all the configuration steps into a single meta feature file. Note that this meta is representative of everything that would otherwise need to be programmed into a page object. But with Gwen meta features, that programming is never necessary.
Now create a new file called floodio.meta in your gwen-web install directory and edit it to contain the following meta specification:
Feature: Flood IO Meta

Scenario: Configure common locators
Given the next button can be located by class name "btn"

Scenario: Configure start page
When I am on the start page
Then the url will be "https://challengers.flood.io/start"
And the Start button can be located by name "commit"

Scenario: Configure step 2 page
When I am on the step 2 page
Then the how old are you dropdown can be located by id "challenger_age"

Scenario: Configure step 3 page
When I am on the step 3 page
Then the largest order value function is "Math.max.apply(Math, $.map($('.radio'), function(x) { return parseInt($(x).text()); }))"
Then the largest order value is defined by javascript "${the largest order value function}"
And the largest order radio button can be located by javascript "$('.radio:contains("' + ${the largest order value function} + '") input[type="radio"]').get(0);"
And the largest order input field can be located by id "challenger_largest_order"

Scenario: Configure step 4 page
# noop - this page only has a next button (we have already defined a common locator for it above)

Scenario: Configure step 5 page
When I am on the step 5 page
Then the one time token can be located by javascript "$('.token').get(0)"
And the one time token field can be located by id "challenger_one_time_token"
Loading Meta
The above meta can now be loaded into Gwen on startup through the -m command line option as follows:
Windows:
gwen -m floodio.meta
Mac:
./gwen -m floodio.meta
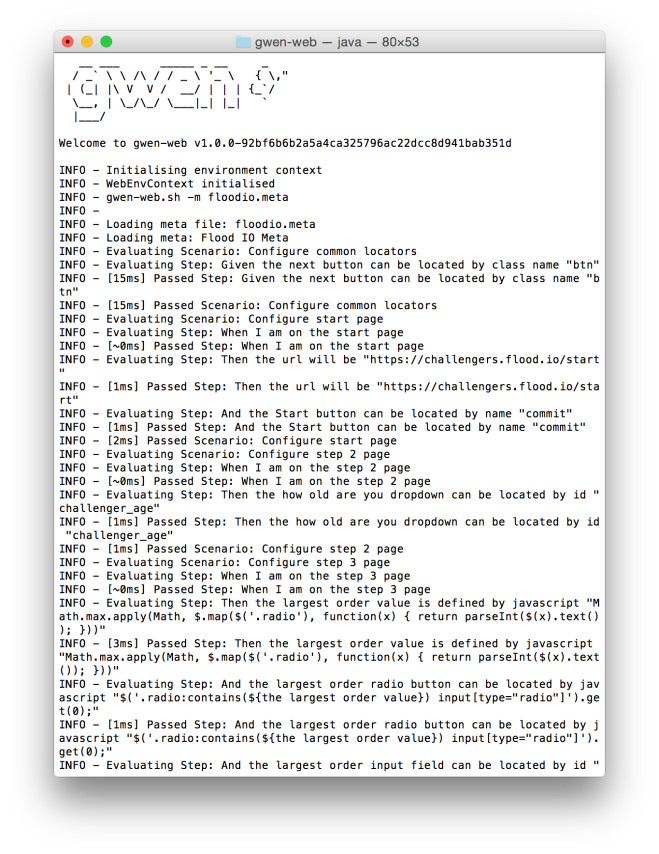
You will notice this time that the REPL console will load the meta when it starts up.
You can type env -a at the Gwen prompt to view all the meta bindings in memory:
{
"scopes" : [ {
"scope" : "feature",
"atts" : [ {
"the next button/locator" : "class name"
}, {
"the next button/locator/class name" : "btn"
}, {
"the largest order value function" : "Math.max.apply(Math, $.map($('.radio'), function(x) { return parseInt($(x).text()); }))"
} ]
}, {
"scope" : "start page",
"atts" : [ {
"url" : "https://challengers.flood.io/start"
}, {
"the Start button/locator" : "name"
}, {
"the Start button/locator/name" : "commit"
} ]
}, {
"scope" : "step 2 page",
"atts" : [ {
"the how old are you dropdown/locator" : "id"
}, {
"the how old are you dropdown/locator/id" : "challenger_age"
} ]
}, {
"scope" : "step 3 page",
"atts" : [ {
"the largest order value/javascript" : "Math.max.apply(Math, $.map($('.radio'), function(x) { return parseInt($(x).text()); }))"
}, {
"the largest order radio button/locator" : "javascript"
}, {
"the largest order radio button/locator/javascript" : "$('.radio:contains(\"' + Math.max.apply(Math, $.map($('.radio'), function(x) { return parseInt($(x).text()); })) + '\") input[type=\"radio\"]').get(0);"
}, {
"the largest order input field/locator" : "id"
}, {
"the largest order input field/locator/id" : "challenger_largest_order"
} ]
}, {
"scope" : "step 5 page",
"atts" : [ {
"the one time token/locator" : "javascript"
}, {
"the one time token/locator/javascript" : "$('.token').get(0)"
}, {
"the one time token field/locator" : "id"
}, {
"the one time token field/locator/id" : "challenger_one_time_token"
} ]
} ]
}
Now we can open a new browser session to the floodio start page and click the start button by entering only the following steps into the REPL:
Given I navigate to the start page
 When I click the Start button
 Then I am on the step 2 page
And similarly for the remaining pages..
Step 2 page:
Given I select "21" in the how old are you dropdown
 When I click the next button
 Then I am on the step 3 page
Step 3 page:
Given I type the largest order value in the largest order input field
  And I click the largest order value
 When I click the next button
 Then I am on the step 4 page
Step 4 page:
When I click the next button
Then I am on the step 5 page
Step 5 page:
Given I wait for the one time token text
  And I type the one time token in the one time token field
 When I click the next button
 Then I am on the done page
When ready, type exit to close the browser and quit the REPL.
Conclusion
In this post, we used the Gwen REPL to directly interact with a web application from scratch. We then factored out the configuration steps into a meta feature and loaded that into the REPL and interacted with the same web application again without reentering any of the configuration steps. We did it all with no page objects too! :)
Next..
In the next post we will write a feature file to automate the same floodio challenge in batch mode and generate evaluation reports. We will also compose custom step definitions and perform some assertions on each page. Lastly we will solve some common ajax and page loading problems that arise when automating web tests.
Update 12 Jan 2015 – As promised, here is the follow up post.

Nice! I had been thinking about how to use gwen to bind to selenium, but still thought there would be a page object like jBehave. The code glue in jBehave or in custom page object felt like a wasteful parallel code tree; a motivational hurdle for developers.
Are you using the same REPL as jboss forge? I read they just switched to a new implementation.
Also have you tried gradle for building scala? I wonder if it is mature enough or would offer any advantages over sbt?
LikeLike
Gwen uses its own REPL implementation and it’s own gherkin parser too. Building these from scratch opened our eyes to new ways of interacting with the web driver API that lead to us realising that most (if not all) page object behavior can be emulated with dynamically scoped attributes instead of java classes that need to be coded.
Regarding sbt, it is well suited and particularly targetted at scala projects and it works very nicely with minimal setup. I personally would not dream of building scala source with any other tool.
LikeLike
Update: Gwen now uses the standard and very fast Gherkin parser implementation below (instead of its own which was implemented using the scala parser combinator library).
https://github.com/cucumber/gherkin
LikeLike